Main menu
You are here
Digispark Programming
[last updated: 2020-05-30]
go to: Digispark
-----
- Note: Digispark can be programmed with the standard IDE (mine currently 1.6.9). However see note in wiki recommending that you do NOT use 1.6.6 or 1.6.7. OTOH, it uses a programming procedure that is different than other Arduinos. Specifically, when you first click upload, the Digispark must be disconnected from the USB/PC. After successful compiling, the IDE will prompt you to plug in the Digispark, and the upload will finish.
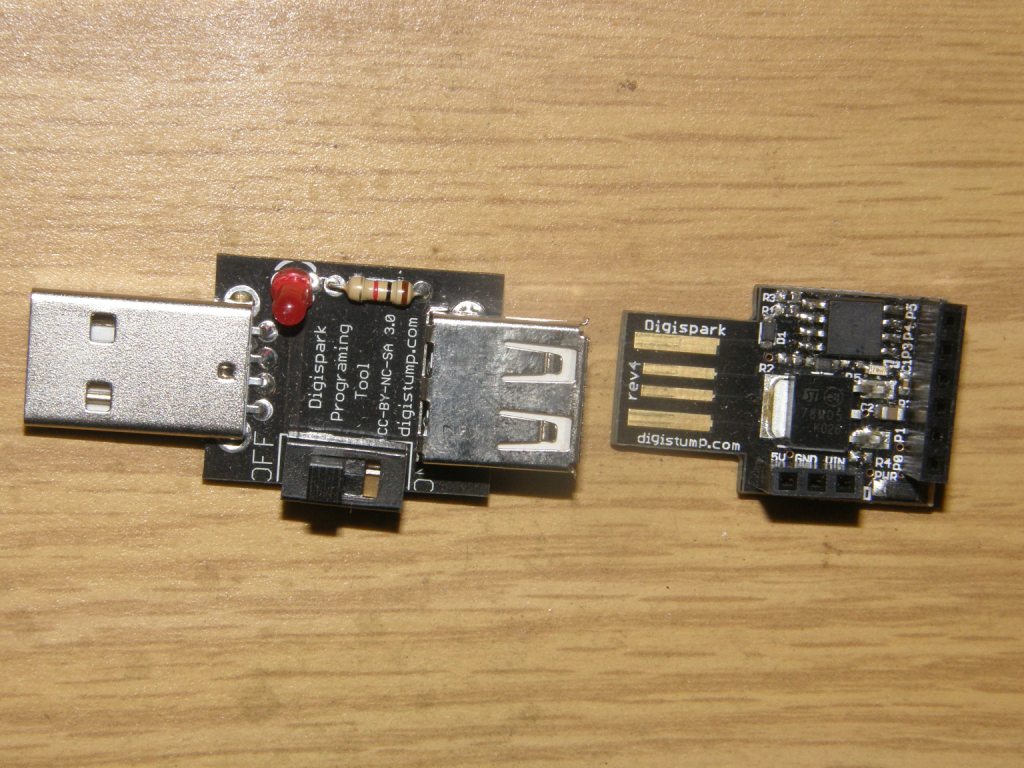
- The Programming Tool available from Digispark facilitates the programming protocol by having a switch in the power line between its input and output USB ports. This adds a convenience by allowing you to do the programming protocol (disconnect Digispark; start upload; reconnect Digispark) without having to physically pull your Digispark board.
- If you are NOT using the Programming tool, then you must start the upload on the IDE with your board disconnected from the USB port, then plug it in when prompted in the IDE.
- plug programmer into PC USB

- switch so that red LED is ON (ie. connection to digiSpark is DISabled)
- insert DigiSpark into programmer.
- Note: if you now switch the toggle to turn red LED Off (ie. connection to digiSpark is ENabled):
- On Dell tower (Windows 10):
- then Digispark Bootloader shows up in Device Manager
- under libusb-win32 Usb Devices
- If it does not show up, then you probably don't have your drivers installed correctly.
- And in fact at this time on my system since the driver is not installed as noted in my startup notes,
enabling the Digispark results in "unknown device" showing up in Device Manager under "Other Devices"
- On Linux:
- $ lsusb
lists a line with: "MCS Digistump Digispark"
which I think indicates that the USB circuit on the Digispark is working and being recognized.
- $ lsusb
- On Dell tower (Windows 10):
- verify your program in the IDE.
Tools > Boards and select Digispark (default 16.5 mhz)
Tools > port will probably be greyed-out, since the DS is not actually connected yet - turn red LED back on before uploading (ie. DISconnect Digispark)...
- click "upload"
- when prompted, plug in Digispark, or switch toggle to turn red LED OFF (ie. connection to digiSpark is ENabled)
- upload will finish & program will run
- go here if error ~ "unknown new version of Micronucleus detected"
-------------------------
- Programming Status on Linux:
- Upon connecting the board when prompted by IDE, upload attempts to finish,
but gives error: micronucleus_connect: Assertion 'res >= 4' failed- Googled that error and found this remedy:
Create a file named /etc/udev/rules.d/digispark.rules with the following line in it:
SUBSYSTEM=="usb", ATTR{idVendor}=="16d0", ATTR{idProduct}=="0753", MODE="0660", GROUP="dialout" - restarted IDE, reUploaded, and voila, it worked!
- Googled that error and found this remedy:
- Upon connecting the board when prompted by IDE, upload attempts to finish,
.
.
.
eof