Main menu
You are here
Baofeng UV-5R: Programming
[last updated: 2026-01-26]
----------------------------------------------------------------
ham radio home page
Baofeng UV-5R home page
See Links at bottom of this page:
-----
On This Page:
----------------------------------------------------------------
- AFAIK, programming for the GT-3TP is identical to that for the UV-5R
However for the GT-3TP in channel mode, programmed channels are displayed in alpha (eg. "Stacker") rather than showing numeric frequency,
and apparently Chirp programming is required to change this.
---------------------------------------------------------------- - Gotcha: The little rubber key pads sometimes get stuck in the sides of their cutouts, leaving them continuously pressed.
If you press a key and nothing happens, inspect other recently-pressed keys to see if any are stuck.- On my radios, the <VFO/MR> key often sticks.
----------------------------------------------------------------
- Programming Overview:
- Parameters:
When you ”Program” your Baofeng,
you are setting a ”Parameter”.There are 41 parameters that can be set ("0" to "40")
These include everything from channels, to power levels, to offsets and other things needed to access a repeater.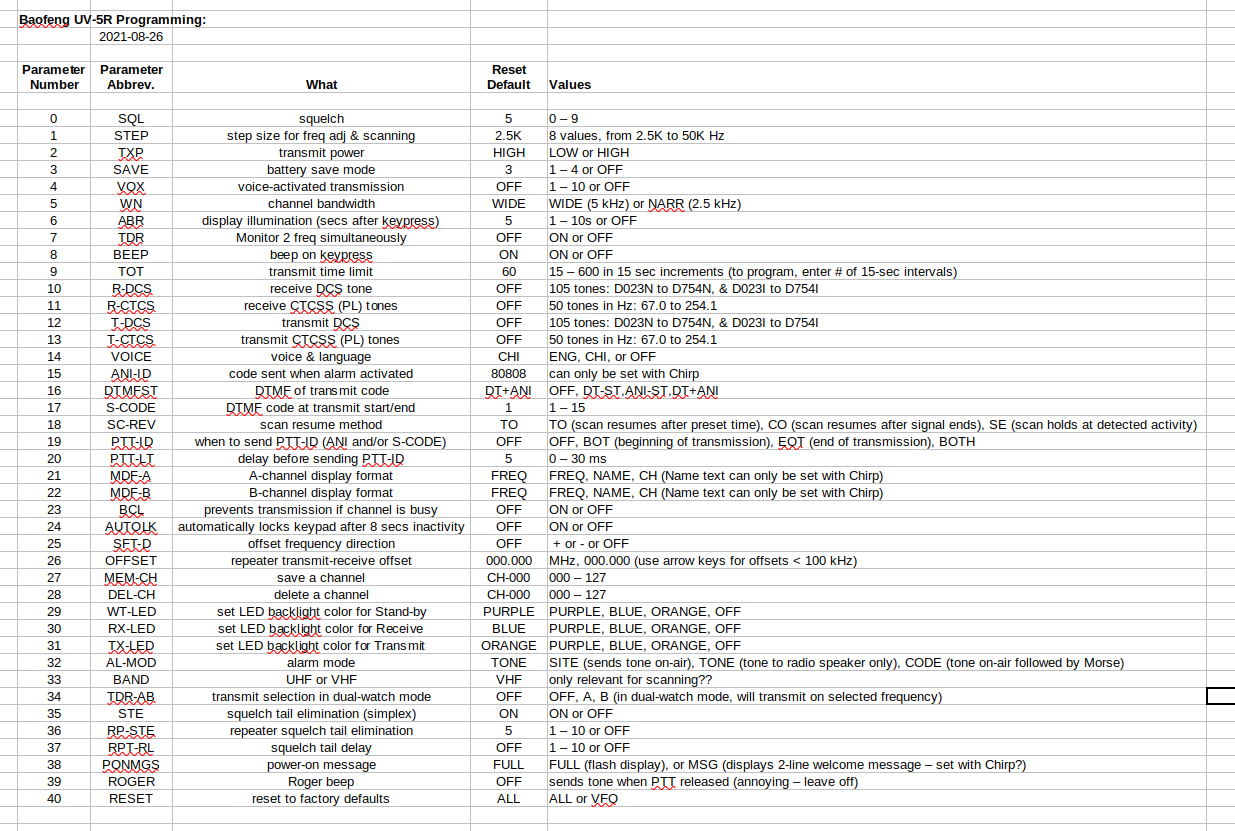
Parameters-
Note that the transmit/receive Frequency itself
is not an actual ‘parameter’,
however when you set parameter #27 (‘save a channel’),
then the frequency that you’ve entered into your display
will be saved into the channel number that you select. - Each parameter has it's own range of allowed values - some are On/Off, some or High/Low, others have a range of numeric or alphanumeric values allowed.
- For example:
- Channels: up to 128 can be programmed ("0" to "127")
- Note for parameter #9:
This is the maximum seconds that you can transmit with one press of the PTT.
Default is 60sec. If you’re long-winded, you may find your transmission cuts off before you’re done. Max is 600 sec.
---------------------------------------------------------------- - Parameter Programming - Summary/Quick Reference for ALL parameters:
- Do First Steps (see below)
- <MENU> key to enter programming mode
- enter or scroll with arrow keys to display the parameter you want to program
- <MENU> to select/lock your selection
- enter or scroll to desired parameter value
- <MENU> to save/confirm parameter value
- <EXIT> to leave programming mode
when you're done or to exit/abort at any time if you're pressed a wrong key
or otherwise want to start over.
----------------------------------------------------------------
- First steps in all programming operations:
- <VFO/MR> to select Frequency Mode.
- Baofeng programming is notoriously weird. Published instructions say to be in Frequency mode for all programming operations.
There may be some exceptions to this for some specific parameters with some radio models,
but the thing is, if you forget, and are in Channel mode when you try to program something, nothing will alert you to your error.
The verbal prompts and menu responses will appear to be working, but in fact (depending on exeptions noted),
after you exit programming mode and close the menu, your programming will be unchanged.
As such, it's just a good idea to always be in Frequency Mode when programming. - <A/B> to select upper freq display.
- Select <BAND> for freq being programmed (not needed on all models)
- Verify TDR off:
<MENU> 7 <MENU>
if it’s ON, press arrow key to toggle it to OFF
<MENU> [to confirm, then]
<EXIT>
- <VFO/MR> to select Frequency Mode.
parameter 0 (squelch) can be any digit from 0 (no squelch) to 9
parameter 14 (voice) can be OFF, ENG, or CHI (Chinese)----------------------------------------------------------------
- Parameter Programming - Detailed steps for ALL parameters:
- Do first steps (see above)
- <MENU> to enter programming mode
voice response: "menu"- Press <EXIT> to leave the menu/programming mode, either when you're done, or when you've pressed a wrong key or otherwise want to abort the process.
A parameter will be displayed. The parameter number will be blinking at the far right of the display.
If you have done no programming since powering on, then SQL (parameter: 0) will display.
If you have done any programming since powering on, then the last parameter you viewed will display.
If the displayed parameter is not the one you want, then go to the one you want:- either use up/down arrows, or
enter the parameter number (one or two digits) from the keypad - When the parameter you want is displayed,
<MENU> to select it
Voice response: "[name of parameter]" •
The current value for that parameter will be displayed. - If the parameter value that is displayed is already what you want, you're done. <EXIT>
If the parameter value displayed is NOT what you want:- either scroll through options using up/down arrow keys, or
enter the value you want with the keypad - <MENU> to confirm/save the value
Voice response: "confirm" - <EXIT>
----------------------------------------------------------------
- Reset everything to factory defaults:
- <MENU> 40 <MENU>
- <MENU> to select ALL
- <MENU> to select SOURCE?
Wait a moment for reset - Now program parameter 14 to set ENG-lish
----------------------------------------------------------------
- Save a Frequency to a Channel:
- Do first steps (see above)
- Delete the intended channel:
This will clear any previous programming on your desired channel.- <MENU> 28 <MENU>
- enter 3-digit channel number
- <MENU> to confirm
- Enter desired frequency with keypad (see Operation Overview)
- Save to a channel:
- <MENU> 27 <MENU>
- enter 3-digits or scroll to desired channel
- <MENU> to confirm
----------------------------------------------------------------
- Programming for a repeater:
- There are 4 things to program for a repeater:
- Repeater transmit frequency (your receive frequency)
- Offset between repeater transmit and receive frequencies
- Direction of offset (offset and offset direction are used to calculate your transmit frequency)
- Tone/Code for repeater access
------------------------------------
- Do first steps (see above)
- Set your receive frequency (repeater transmit frequency) using keypad
- Set repeater offset: (OFFSET)
<MENU> 26 <MENU>
enter offset frequency in kHz (enter 6 digits)- eg. to enter 0.6 MHz (600 kHz), enter: 0 - 0 - 0 - 6 - 0 - 0
<MENU> to confirm
<exit> - Set repeater offset shift direction: (SFT-D)
<MENU> 25 <MENU>
use up and down arrows to select desired direction
<MENU> to confirm
<exit> - Enter PL tones if needed:
<MENU> 13 <MENU> (T-CTCS for transmit PL tone - most common)
Use up/down buttons to find correct tone for the repeater being programmed
<MENU> to confirm
<exit>- Alternatively your repeater may require you to program T-DCS, R-DCS, or R-CTCS
------------------------------------
- Save repeater programming to desired channel:
<MENU> 27 <MENU>
Voice: "Memory channel"
scroll to or enter desired channel (3 digits),- eg. for channel 4, enter: 0 - 0 - 4
- If the display shows "CH-004", then the channel is already programmed and proceeding will overwrite previous programming
- If the display shows "004", then there is no previous programming in this channel.
- Note: Overwriting previous programming may not overwrite all parameters in previous programming.
If you want to re-use an already programmed channel, it's much safer to first delete the channel (parameter: 28) and start fresh.<MENU> to confirm
Voice: "Receiving memory "
<MENU>
Voice: "Memory channel"
<MENU> to confirm
Voice: "Transmitting memory"
<exit> - Press <*Scan> to enter reverse mode
and display saved transmit frequency.
(to confirm that programming worked) - Press <*Scan> to exit reverse mode
----------------------------------------------------------------
- There are 4 things to program for a repeater:
- Programming with a computer running Chirp via USB cable
- (link to:) Get chirp:
Chirp is available for Windows, Mac, and Linux operating systems.
Instructions below are what I use for my Linux computers. See link above for instructions for other OS.
For Linux:
Ubuntu Linux (or Mint): install and use the PPA:
$ sudo apt-add-repository ppa:dansmith/chirp-snapshots
$ sudo apt-get update
$ sudo apt-get install chirp-daily - After installing the build from the PPA, new updates will be included in your normal system software updates.
- Also take additional steps to gain access to your serial port:
If you get an "access denied" error when accessing serial port, you may need to adjust permissions on the /dev/tty(something) device, or add users to the "dialout" group to grant access to the serial device.
$ sudo addgroup "$USERNAME" dialout
Log out and back in for changes to take effect. - see (link to:) Chirp - FAQ for help
- (link to:) Get chirp:
----------------------------------------------------------------
- Parameters:
- Links:
----------------------------------------------------------------
.
.
.
eof